Home » Eclipse Creator Support » Installation » Installation of Eclipse Creator VR
This step is best performed at home or on a private unrestricted network rather than a public network (university campus, school or college network).
There is more help and information for setting up your headset here: https://support.fourplus.co.uk/eclipse-creator-support/fourplus-application-installation-support/fourplus-vr-hardware-support/
During this phase, you will be met by a request to connect to the internet. This is not easily done when using a locked network such as Eduroam; thus, is it recommended to perform the initial set up on a less restricted (but trusted) network, such as a home network.
We recommend operating with passthrough mode on to perform software installations. This allows a view of a laptop screen and license code without the need to constantly remove and replace the headset, which can be uncomfortable/time consuming.
If you require any additional assistance with setting up your Meta Quest headset visit – https://www.meta.com/en-gb/help/quest/
Below is a guide for the installation of the Eclipse Creator app to Meta headset.
Ensure you have access to your Meta account-associated email and find the emails from FourPlus which give you your license keys. Once you have received your license keys you can access the full version of the VR app from the Meta Horizon app store.


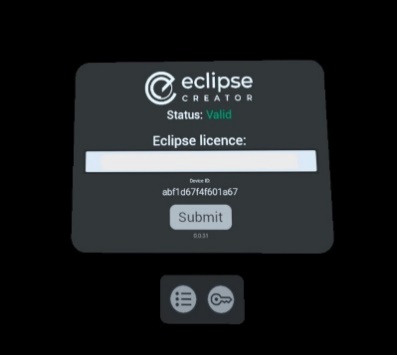
Access to content will be limited until customers have been supplied with their license key. However there is a FREE demo that can be accessed prior to this. To gain full access to the full content, you will need to enter your Eclipse Creator license key in the app. This key will be assigned personally and is unique to your institution, so it must not be shared. When inputting this key while wearing the VR headsets, it is advised to first copy the key into a blank word document. For ease of reading you should size to 24+ font and insert dashes every fifth digit (e.g. XXXXX-XXXXX-XXXXX-XXXXX-XXXXX). If you are not operating in passthrough mode, switch pass through on via the settings menu. Now you should be able to see your laptop screen and no longer need to remove/replace the headset to read the license key.
If you experience any problems when trying to install or update the VR app then visit our FAQs – https://support.fourplus.co.uk/eclipse-creator-support/fourplus-support-faqs/
We use them to give you the best experience. If you continue using our website, we’ll assume that you are happy to receive all cookies on this website